Azure is the most sought-after service as it helps much in Cloud Computing. It has a collection of many services like Virtual Machine and sixty-eight other products that are mainly used in cloud computing.
If you are a blogger or a web designer then you should host your WordPress site with Microsoft Azure. It brings you more advantages than any other Virtual Machine platform.
Azure will let you host more than one website which is a great benefit if you are a user with multiple websites.
I prefer using Azure as its speed is unimaginably great compared to other hosting sites.
Step by Step Guide to Set up Azure
To set up Azure you first need to create a WordPress Resource and then complete WordPress Installation.
Step 1: Creating a WordPress Resource
Setting up Azure: Complete the entire sign up process on Microsoft Dev Essentials and receive free credits. After registering on MS Dev, go to Azure website and log in with your credentials.
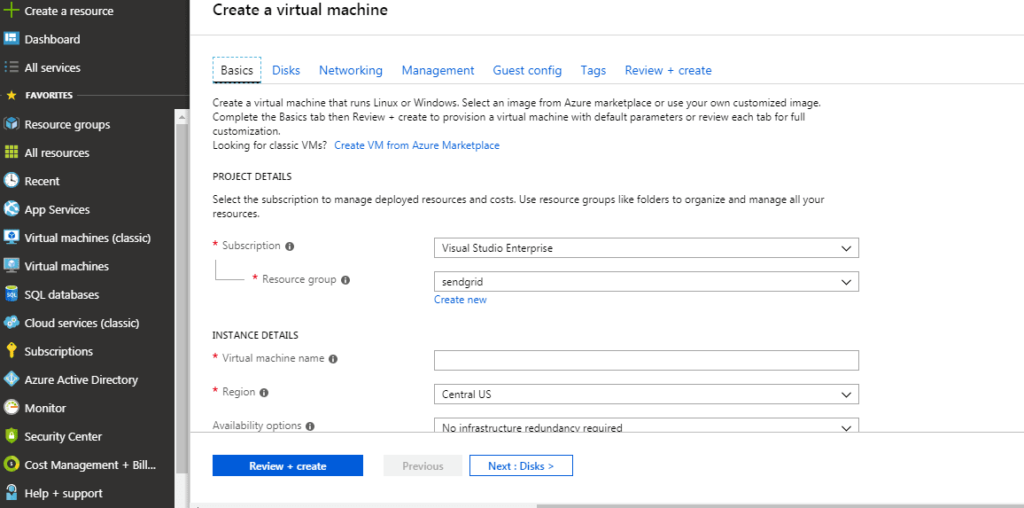
Creating Virtual Machine: To deploy the server, we need to create a Virtual Machine VM using windows or even other versions.
Configurations: In order to create a VM, certain configurations are to be done. Choose a unique name for the machine. Choose the VM disk type as SSDD so that the server performs at a greater speed. Select ‘Create new’ under the resource group and select a name. The name starts with ‘RG’ that follows your VM’s name. The next step is to choose the location. The location closest must be chosen for an improved latency.
Size of VM: The next step is to choose the size of your virtual machine that is depending on the project’s requirement. Use DS1_V2 for hosting common projects. This will make your website to attract more traffic and scale up your business. Azure has its name for easy scaling and hence proving it. You need not select cost as you are choosing the free credit given by Azure.
Specifications of DS1_V2: It has 3.5 GB RAM and comes with a single core processor. It has 7GB of SSD disk space. If you are a using server around South East Asian region, then it would cost up to 60 USD.
Settings: It is the most important step as it involves configuration of IPs. The name of your storage account can be created here. The configuration of your Virtual machine’s IP is done here. Static IP or Dynamic IP can be chosen based on the requirements. A new inbound rule must be created in Network Security group Firewall. To add this rule, select Network Security Group Firewall from the menu. Under ‘Inbound rules’ select ‘add an inbound rule’. To set up this rule, input the following configurations.
Name: “http”
Priority: Any integer greater than SSH’s priority, greater than 1000.
Service: “HTTP”
Port: 80 (which is default)
Protocol: TCP
Action: Allow
- Validation: After completing all the process, Azure will be validating on the Virtual Machine and you can deploy the process by clicking ‘OK’. It takes a few minutes to deploy and you can see that your Virtual machine is running.
Step 2: Installing WordPress
You have now created and deployed a virtual machine. The next step is to Install WordPress
- Dashboard settings
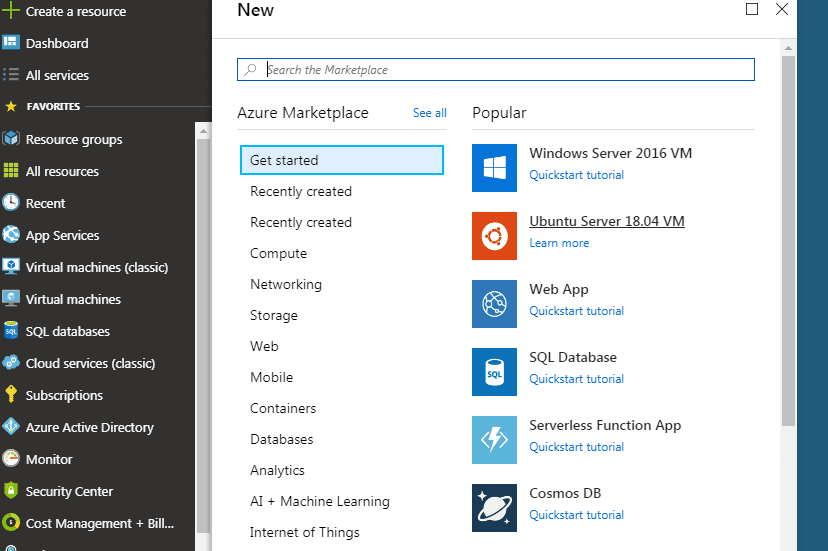
Once you have entered the Microsoft Azure webapp, you will see a dashboard with many application names on the left pane if you are using Azure for other applications. If not, look for ‘+NEW’ on the dashboard.
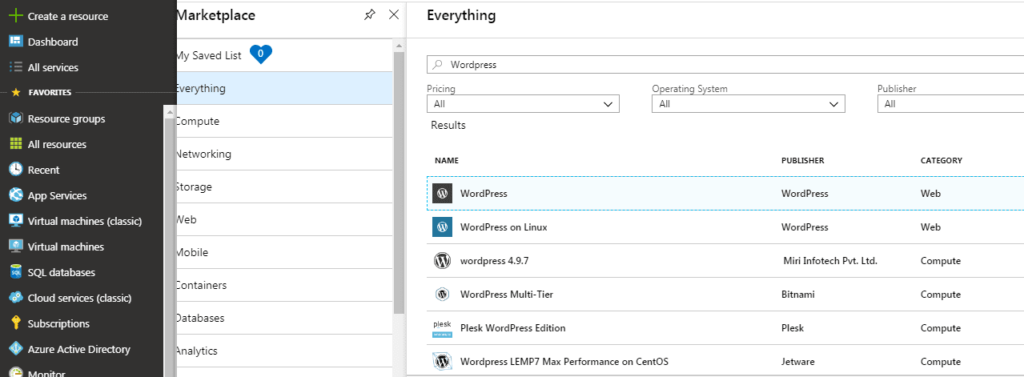
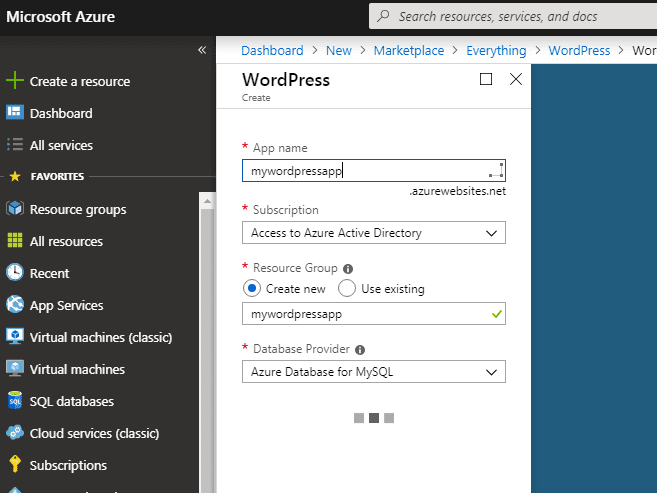
WordPress search: After clicking ‘New’, you can search for ‘WordPress’ on the search bar and the list of applications published by various publishers appears. You have to choose the first official WordPress published by the company itself and click create.

Here are a few details about various options that you need to fill before you can use WordPress on Azure:
Username: The dashboard with setting up of WordPress appears and you have to choose the options one by one. Give a unique name that is going to appear on your WordPress site.
Subscription: The next step is to choose subscription. Here, I’m keeping it as ‘free trial’.
Resource group: The next step is to choose the resource group. You will be having two options ‘Create new’ and ‘Use existing’. Since we are creating our own WordPress domain, choose ‘Create new’radio button.
Database provider: Two providers are available. One is ‘Azure database for My SQL (preview) and the other one is ‘My SQL in app’.
When to use Azure database for My SQL: If you have a huge database requirements then choose ‘Azure database for my SQL’. After choosing this database provider, you have to setup database configuration settings.
When to use My SQL in app: My SQL in-app can be chosen if you are going to handle a few data transfers. It is mainly for a short-term website creation like for an event or for a single use purpose.
After choosing ‘My SQL in-app’, you will be seeing ‘App service plant/location’. We will use the default location. If you are willing to change the location then you can create new with the mentioned pricing.
After providing all the above details in the dashboard, click ‘CREATE’. That’s it and it takes a few minutes to host the WordPress. It will show as ‘Displaying WordPress’ and your good to go after the creation. You can see the WordPress created under your name (which is the unique name given at the start of the process). It is similar to the WordPress template and if you click on ‘Browse’ it redirects to the website with our name.
As a part of the prerequisite, you need to have an Azure subscription which is quite obvious. A bit of knowledge on WordPress to work on the dashboard is also important. We can choose the WordPress seamlessly with the help of Azure webapp. It is very simple and easy to install as the templates and plug-ins are easy to use.